Sunday, January 23, 2011
Moving volume group to another Server in Linux
Moving a VG to another server:
To do this we use the vgexport and vgimport commands.
vgexport and vgimport is not necessary to move disk drives from one server to another. It is an administrative policy tool to prevent access to volumes in the time it takes to move them.
1. Unmount the file system
First, make sure that no users are accessing files on the active volume, then unmount it
# unmount /appdata
2.Mark the volume group inactive
Marking the volume group inactive removes it from the kernel and prevents any further activity on it.
# vgchange -an appvg
vgchange -- volume group "appvg" successfully deactivate
3. Export the volume group
It is now must to export the volume group. This prevents it from being accessed on the old server and prepares it to be removed.
# vgexport appvg
vgexport -- volume group "appvg" successfully exported
Now, When the machine is next shut down, the disk can be unplugged and then connected to it's new machine
4. Import the volume group
When it plugged into the new server, it becomes /dev/sdc (depends).
so an initial pvscan shows:
# pvscan
pvscan -- reading all physical volumes (this may take a while...)
pvscan -- inactive PV "/dev/sdc1" is in EXPORTED VG "appvg" [996 MB / 996 MB free]
pvscan -- inactive PV "/dev/sdc2" is in EXPORTED VG "appvg" [996 MB / 244 MB free]
pvscan -- total: 2 [1.95 GB] / in use: 2 [1.95 GB] / in no VG: 0 [0]
We can now import the volume group (which also activates it) and mount the file system.
If you are importing on an LVM 2 system, run:
# vgimport appvg
Volume group "vg" successfully imported
5. Activate the volume group
You must activate the volume group before you can access it.
# vgchange -ay appvg
Mount the file system
# mkdir -p /appdata
# mount /dev/appvg/appdata /appdata
The file system is now available for use.

CLEANING UP THE LINUX BUFFER CACHE
When you write data, it doesn’t necessarily get written to disk right then. The kernel maintains caches of many things, and disk data is something where a lot of work is done to keep everything fast and efficient.
That’s great for performance, but sometimes you want to know that data really has gotten to the disk drive. This could be because you want to test the performance of the drive, but could also be when you suspect a drive is malfunctioning: if you just write and read back, you’ll be reading from cache, not from actual disk platters.
Obviously the first thing you need to do is get the data in the cache sent on its way to the disk. That’s “sync”, which tells the kernel that you want the data written. But that doesn’t mean that a subsequent read comes from disk: if the requested data is still in cache, that’s where it will be fetched from. It also doesn’t necessarily mean that the kernel actually has sent the data along to the disk controller: a “sync” command is a request, not a command that says “stop everything else you are doing and write your whole buffer cache to disk right now!”. No, “sync” just means that the cache will be written, as and when the kernel has time to do so.
Note that you really didn’t even need the “sync” if this is what you are doing: the overwrite forces the sync itself.
Modern Linux kernels make this a bit easier: in /proc/sys/vm/ you’ll find “drop_caches”.
You can simply echo a number to that to free caches.
To free pagecache:
echo 1 > /proc/sys/vm/drop_caches
To free dentries and inodes:
echo 2 > /proc/sys/vm/drop_caches
To free pagecache, dentries and inodes:
echo 3 > /proc/sys/vm/drop_caches
That’s great for performance, but sometimes you want to know that data really has gotten to the disk drive. This could be because you want to test the performance of the drive, but could also be when you suspect a drive is malfunctioning: if you just write and read back, you’ll be reading from cache, not from actual disk platters.
Obviously the first thing you need to do is get the data in the cache sent on its way to the disk. That’s “sync”, which tells the kernel that you want the data written. But that doesn’t mean that a subsequent read comes from disk: if the requested data is still in cache, that’s where it will be fetched from. It also doesn’t necessarily mean that the kernel actually has sent the data along to the disk controller: a “sync” command is a request, not a command that says “stop everything else you are doing and write your whole buffer cache to disk right now!”. No, “sync” just means that the cache will be written, as and when the kernel has time to do so.
Note that you really didn’t even need the “sync” if this is what you are doing: the overwrite forces the sync itself.
Modern Linux kernels make this a bit easier: in /proc/sys/vm/ you’ll find “drop_caches”.
You can simply echo a number to that to free caches.
To free pagecache:
echo 1 > /proc/sys/vm/drop_caches
To free dentries and inodes:
echo 2 > /proc/sys/vm/drop_caches
To free pagecache, dentries and inodes:
echo 3 > /proc/sys/vm/drop_caches
Clear Swap Space in Linux
There have been times where it has been necessary for UNIX Admins to clear out the swap space on a Linux system. In order to do this, you must first make sure that you have enough free memory to hold what is being used by swap.
First we want to see what is currently being used.
free
Then I run the actual commands that empty the swap:
swapoff -a
free
swapon -a
Then I check what is being used after doing this.
free
First we want to see what is currently being used.
free
Then I run the actual commands that empty the swap:
swapoff -a
free
swapon -a
Then I check what is being used after doing this.
free
Find RPM packages installed on particular date
To find all the RPM packages which were installed on a particular date in a Linux Server:
# rpm -qa --queryformat "%{NAME}-%{VERSION}.%{RELEASE} (%{ARCH}) INSTALLED: %{INSTALLTIME:date}\n" | grep my_date
Example:
rpm -qa --queryformat "%{NAME}-%{VERSION}.%{RELEASE} (%{ARCH}) INSTALLED: %{INSTALLTIME:date}\n" | grep "21 Sep 2009"
To find the install date and time of a particular RPM package in a Linux Server:
# rpm -qa --queryformat "%{NAME}-%{VERSION}.%{RELEASE} (%{ARCH}) INSTALLED: %{INSTALLTIME:date}\n" | grep rpm_package_name
Example:
rpm -qa --queryformat "%{NAME}-%{VERSION}.%{RELEASE} (%{ARCH}) INSTALLED: %{INSTALLTIME:date}\n" | grep libaio
# rpm -qa --queryformat "%{NAME}-%{VERSION}.%{RELEASE} (%{ARCH}) INSTALLED: %{INSTALLTIME:date}\n" | grep my_date
Example:
rpm -qa --queryformat "%{NAME}-%{VERSION}.%{RELEASE} (%{ARCH}) INSTALLED: %{INSTALLTIME:date}\n" | grep "21 Sep 2009"
To find the install date and time of a particular RPM package in a Linux Server:
# rpm -qa --queryformat "%{NAME}-%{VERSION}.%{RELEASE} (%{ARCH}) INSTALLED: %{INSTALLTIME:date}\n" | grep rpm_package_name
Example:
rpm -qa --queryformat "%{NAME}-%{VERSION}.%{RELEASE} (%{ARCH}) INSTALLED: %{INSTALLTIME:date}\n" | grep libaio
Configuring Network Bonding in Linux
Configuring Network Bonding in Linux
This is an Nice Article which I found on Web..
Bonding is creation of a single bonded interface by combining 2 or more ethernet interfaces. This helps in high availability and performance improvement.
Here is the steps for creating a network bonding in Fedora Core and Redhat Linux
Step 1:
Create the file ifcfg-bond0 with the IP address, netmask and gateway. Shown below is my test bonding configuration file.
$ cat /etc/sysconfig/network-scripts/ifcfg-bond0
DEVICE=bond0
IPADDR=192.168. 1.100
NETMASK=255. 255.255.0
GATEWAY=192. 168.1.1
USERCTL=no
BOOTPROTO=none
ONBOOT=yes
Step 2:
Modify eth0, eth1 and eth2 configuration as shown below. Comment out, or remove the ip address, netmask, gateway and hardware address from each one of these files, since settings should only come from the ifcfg-bond0 file above.
$ cat /etc/sysconfig/network-scripts/ifcfg-eth0
DEVICE=eth0
BOOTPROTO=none
ONBOOT=yes
MASTER=bond0
SLAVE=yes
$ cat /etc/sysconfig/network-scripts/ifcfg-eth1
DEVICE=eth1
BOOTPROTO=none
ONBOOT=yes
USERCTL=no
MASTER=bond0
SLAVE=yes
$ cat /etc/sysconfig/network-scripts/ifcfg-eth2
DEVICE=eth2
BOOTPROTO=none
ONBOOT=yes
MASTER=bond0
SLAVE=yes
Step 3:
Set the parameters for bond0 bonding kernel module. Add the following lines to/etc/modprobe. conf
# bonding commands
alias bond0 bonding
options bond0 mode=balance-alb miimon=100
Note: Here we configured the bonding mode as "balance-alb". All the available modes are given at the end and you should choose appropriate mode specific to your requirement.
Step 4:
Load the bond driver module from the command prompt.
$ modprobe bonding
Step 5:
Restart the network, or restart the computer.
$ service network restart Or restart computer
When the machine boots up check the proc settings.
$ cat /proc/net/bonding/bond0
Ethernet Channel Bonding Driver: v3.0.2 (March 23, 2006)
Bonding Mode: adaptive load balancing
Primary Slave: None
Currently Active Slave: eth2
MII Status: up
MII Polling Interval (ms): 100
Up Delay (ms): 0
Down Delay (ms): 0
Slave Interface: eth2
MII Status: up
Link Failure Count: 0
Permanent HW addr: 00:14:72:80: 62:f0
Look at ifconfig -a and check that your bond0 interface is active. You are done!
RHEL bonding supports 7 possible "modes" for bonded interfaces. These modes determine the way in which traffic sent out of the bonded interface is actually dispersed over the real interfaces. Modes 0, 1, and 2 are by far the most commonly used among them.
* Mode 0 (balance-rr)
This mode transmits packets in a sequential order from the first available slave through the last. If two real interfaces are slaves in the bond and two packets arrive destined out of the bonded interface the first will be transmitted on the first slave and the second frame will be transmitted on the second slave. The third packet will be sent on the first and so on. This provides load balancing and fault tolerance.
* Mode 1 (active-backup)
This mode places one of the interfaces into a backup state and will only make it active if the link is lost by the active interface. Only one slave in the bond is active at an instance of time. A different slave becomes active only when the active slave fails. This mode provides fault tolerance.
* Mode 2 (balance-xor)
Transmits based on XOR formula. (Source MAC address is XOR'd with destination MAC address) modula slave count. This selects the same slave for each destination MAC address and provides load balancing and fault tolerance.
* Mode 3 (broadcast)
This mode transmits everything on all slave interfaces. This mode is least used (only for specific purpose) and provides only fault tolerance.
* Mode 4 (802.3ad)
This mode is known as Dynamic Link Aggregation mode. It creates aggregation groups that share the same speed and duplex settings. This mode requires a switch that supports IEEE 802.3ad Dynamic link.
* Mode 5 (balance-tlb)
This is called as Adaptive transmit load balancing. The outgoing traffic is distributed according to the current load and queue on each slave interface. Incoming traffic is received by the current slave.
* Mode 6 (balance-alb)
This is Adaptive load balancing mode. This includes balance-tlb + receive load balancing (rlb) for IPV4 traffic. The receive load balancing is achieved by ARP negotiation. The bonding driver intercepts the ARP Replies sent by the server on their way out and overwrites the src hw address with the unique hw address of one of the slaves in the bond such that different clients use different hw addresses for the server.
This is an Nice Article which I found on Web..
Bonding is creation of a single bonded interface by combining 2 or more ethernet interfaces. This helps in high availability and performance improvement.
Here is the steps for creating a network bonding in Fedora Core and Redhat Linux
Step 1:
Create the file ifcfg-bond0 with the IP address, netmask and gateway. Shown below is my test bonding configuration file.
$ cat /etc/sysconfig/network-scripts/ifcfg-bond0
DEVICE=bond0
IPADDR=192.168. 1.100
NETMASK=255. 255.255.0
GATEWAY=192. 168.1.1
USERCTL=no
BOOTPROTO=none
ONBOOT=yes
Step 2:
Modify eth0, eth1 and eth2 configuration as shown below. Comment out, or remove the ip address, netmask, gateway and hardware address from each one of these files, since settings should only come from the ifcfg-bond0 file above.
$ cat /etc/sysconfig/network-scripts/ifcfg-eth0
DEVICE=eth0
BOOTPROTO=none
ONBOOT=yes
MASTER=bond0
SLAVE=yes
$ cat /etc/sysconfig/network-scripts/ifcfg-eth1
DEVICE=eth1
BOOTPROTO=none
ONBOOT=yes
USERCTL=no
MASTER=bond0
SLAVE=yes
$ cat /etc/sysconfig/network-scripts/ifcfg-eth2
DEVICE=eth2
BOOTPROTO=none
ONBOOT=yes
MASTER=bond0
SLAVE=yes
Step 3:
Set the parameters for bond0 bonding kernel module. Add the following lines to/etc/modprobe. conf
# bonding commands
alias bond0 bonding
options bond0 mode=balance-alb miimon=100
Note: Here we configured the bonding mode as "balance-alb". All the available modes are given at the end and you should choose appropriate mode specific to your requirement.
Step 4:
Load the bond driver module from the command prompt.
$ modprobe bonding
Step 5:
Restart the network, or restart the computer.
$ service network restart Or restart computer
When the machine boots up check the proc settings.
$ cat /proc/net/bonding/bond0
Ethernet Channel Bonding Driver: v3.0.2 (March 23, 2006)
Bonding Mode: adaptive load balancing
Primary Slave: None
Currently Active Slave: eth2
MII Status: up
MII Polling Interval (ms): 100
Up Delay (ms): 0
Down Delay (ms): 0
Slave Interface: eth2
MII Status: up
Link Failure Count: 0
Permanent HW addr: 00:14:72:80: 62:f0
Look at ifconfig -a and check that your bond0 interface is active. You are done!
RHEL bonding supports 7 possible "modes" for bonded interfaces. These modes determine the way in which traffic sent out of the bonded interface is actually dispersed over the real interfaces. Modes 0, 1, and 2 are by far the most commonly used among them.
* Mode 0 (balance-rr)
This mode transmits packets in a sequential order from the first available slave through the last. If two real interfaces are slaves in the bond and two packets arrive destined out of the bonded interface the first will be transmitted on the first slave and the second frame will be transmitted on the second slave. The third packet will be sent on the first and so on. This provides load balancing and fault tolerance.
* Mode 1 (active-backup)
This mode places one of the interfaces into a backup state and will only make it active if the link is lost by the active interface. Only one slave in the bond is active at an instance of time. A different slave becomes active only when the active slave fails. This mode provides fault tolerance.
* Mode 2 (balance-xor)
Transmits based on XOR formula. (Source MAC address is XOR'd with destination MAC address) modula slave count. This selects the same slave for each destination MAC address and provides load balancing and fault tolerance.
* Mode 3 (broadcast)
This mode transmits everything on all slave interfaces. This mode is least used (only for specific purpose) and provides only fault tolerance.
* Mode 4 (802.3ad)
This mode is known as Dynamic Link Aggregation mode. It creates aggregation groups that share the same speed and duplex settings. This mode requires a switch that supports IEEE 802.3ad Dynamic link.
* Mode 5 (balance-tlb)
This is called as Adaptive transmit load balancing. The outgoing traffic is distributed according to the current load and queue on each slave interface. Incoming traffic is received by the current slave.
* Mode 6 (balance-alb)
This is Adaptive load balancing mode. This includes balance-tlb + receive load balancing (rlb) for IPV4 traffic. The receive load balancing is achieved by ARP negotiation. The bonding driver intercepts the ARP Replies sent by the server on their way out and overwrites the src hw address with the unique hw address of one of the slaves in the bond such that different clients use different hw addresses for the server.
Wednesday, January 5, 2011
Yahooooooo! in Outlook
If you want to "POP" your Yahoo! Mail into your Outlook 2007 application, here's how:
From the Tools menu, select "Account Settings." If you do not see "Account Settings," place your cursor over the two arrows at the bottom of the list to display more choices.
On the Email tab, click New.
Check the box next to the first option, “Microsoft Exchange, POP3, IMAP, or HTTP” and click Next.
In the Your Name box, type your name as you'd like it to appear when you send a message.
In the Email Address box, enter your Yahoo! Mail address (for example, "user@yahoo.com").
Check the box for “Manually configure server settings or additional server types” and click Next.
Check the box next to the first option “Internet E-mail” and click Next.
In the Server Information area, under “Account Type” select POP 3 from the pull-down menu.
In the Incoming mail server field, enter: pop.mail.yahoo.com.sg
In the Outgoing mail server (SMTP) field, enter: smtp.mail.yahoo.com.sg
In the Login Information area, in the User Name field, enter your Yahoo! ID (your email address without the "@yahoo.com").
In the Password box, enter your Yahoo! Mail password.
Check "Remember Password" if you don't want Outlook to prompt you for your password each time you check your mail. Handy!
Do not check the box labeled "Log on using Secure Password Authentication (SPA)."
Click on the More Settings button.
Click on the Outgoing Server tab and check the box next to “My outgoing server (SMTP) requires authentication.”
Click on the Advanced tab.
Under “Incoming Server (POP3)”, check the box next to “This server requires an encrypted connection (SSL)". The port number in the “Incoming Server (POP3)" field should automatically change from 110 to 995. If it doesn’t, make sure the port number is set to 995.
Under “Outgoing Server (SMTP)”, check the box next to “This server requires an encrypted connection (SSL)". Enter port number “465” in the “Outgoing Server (SMTP)” field.
If you'd like to keep a copy of your email messages on the Yahoo! Mail server, check the box next to "Leave a copy of messages on the server." If you want to delete your messages from the Yahoo! Mail server after viewing them in Outlook, don't check the box.
Click the OK button.
Click the Next button on the Email Account Wizard, then click Finished.
Would you like your Yahoo! Mail inbox to be your primary inbox in Outlook 7? If so, click the Tools menu and select "Account Settings." If you don’t see "Account Settings," place your cursor over the two arrows at the bottom of the list to display more choices.
From the list, select the pop.yahoo account you've just added and click the Set as Default button.
Click the Close button. You’re done!
From the Tools menu, select "Account Settings." If you do not see "Account Settings," place your cursor over the two arrows at the bottom of the list to display more choices.
On the Email tab, click New.
Check the box next to the first option, “Microsoft Exchange, POP3, IMAP, or HTTP” and click Next.
In the Your Name box, type your name as you'd like it to appear when you send a message.
In the Email Address box, enter your Yahoo! Mail address (for example, "user@yahoo.com").
Check the box for “Manually configure server settings or additional server types” and click Next.
Check the box next to the first option “Internet E-mail” and click Next.
In the Server Information area, under “Account Type” select POP 3 from the pull-down menu.
In the Incoming mail server field, enter: pop.mail.yahoo.com.sg
In the Outgoing mail server (SMTP) field, enter: smtp.mail.yahoo.com.sg
In the Login Information area, in the User Name field, enter your Yahoo! ID (your email address without the "@yahoo.com").
In the Password box, enter your Yahoo! Mail password.
Check "Remember Password" if you don't want Outlook to prompt you for your password each time you check your mail. Handy!
Do not check the box labeled "Log on using Secure Password Authentication (SPA)."
Click on the More Settings button.
Click on the Outgoing Server tab and check the box next to “My outgoing server (SMTP) requires authentication.”
Click on the Advanced tab.
Under “Incoming Server (POP3)”, check the box next to “This server requires an encrypted connection (SSL)". The port number in the “Incoming Server (POP3)" field should automatically change from 110 to 995. If it doesn’t, make sure the port number is set to 995.
Under “Outgoing Server (SMTP)”, check the box next to “This server requires an encrypted connection (SSL)". Enter port number “465” in the “Outgoing Server (SMTP)” field.
If you'd like to keep a copy of your email messages on the Yahoo! Mail server, check the box next to "Leave a copy of messages on the server." If you want to delete your messages from the Yahoo! Mail server after viewing them in Outlook, don't check the box.
Click the OK button.
Click the Next button on the Email Account Wizard, then click Finished.
Would you like your Yahoo! Mail inbox to be your primary inbox in Outlook 7? If so, click the Tools menu and select "Account Settings." If you don’t see "Account Settings," place your cursor over the two arrows at the bottom of the list to display more choices.
From the list, select the pop.yahoo account you've just added and click the Set as Default button.
Click the Close button. You’re done!
Wednesday, September 22, 2010
RHEL 5.4 Installaition
RHEL 5.4 Installaition on Intel
Linux Installation: (RHEL 5.4)
Ram:2gb
Hard Disk:140gb
Intel X86 platform
Step 1: Mount the Red Hat Enterprise Linux X86_64 image and boot the server and at the splash screen press Enter key to begin install.

Step 2: Select OK to run a media test (optional) or skip

Step 3: Select Next

Step 4: Select English and press Next

Step 5: Select the Key board type as US English and press Next

Step 6: Select skip entering the installation number and Click OK.

Step 7: Click SKIP

Step 8: Select Create Custom Layout and Click Next


Step 9: Creating Partitions

Step 9.1: Click – New –Add Partition Window Opens

Mount Point = /boot
File System Type=ext3
Size(MB) = 2000
Check force to be primary partition and Click OK
Step 9.2: Click – New –Add Partition Window Opens

File System Type=physical volume (LVM)
Size(MB) = 137978
Check force to be primary partition
Click OK
Step 9.3: Click LVM – Make LVM Volume Group Window opens

Specify Volume Group Name =vgroot
Click on Add – Make Logical Volume Window Opens
Mount Point = /
File System Type=ext3
Logical Volume Name=lvroot
Size (MB) =10000
Click OK
Step 9.4: Click on Add – Make Logical Volume Window Opens
Mount Point = /usr
File System Type=ext3
Logical Volume Name=lvusr
Size (MB) =12000
Click OK
Step 9.5: Click on Add – Make Logical Volume Window Opens
Mount Point = /var
File System Type=ext3
Logical Volume Name=lvvar
Size (MB) =15000
Click OK
Step 9.6: Click on Add – Make Logical Volume Window Opens
Mount Point = /tmp
File System Type=ext3
Logical Volume Name=lvtmp
Size (MB) =10000
Click OK
Step 9.7: Click on Add – Make Logical Volume Window Opens
Mount Point = /home
File System Type=ext3
Logical Volume Name=lvhome
Size (MB) =5000
Click OK
Step 9.8: Click on Add – Make Logical Volume Window Opens
Mount Point = /opt
File System Type=ext3
Logical Volume Name=lvopt
Size (MB) =8000
Click OK
Step 9.9: Click on Add – Make Logical Volume Window Opens
File System Type=lvswap
Logical Volume Name=lvswap
Size (MB) =32000
Click OK
Step 10: Click Next

Step 11: Here we can specify Network Settings


Set the hostname manually = ecs01.ecsme.com
Specify Gateway = 192.168.1.0
Click on Edit
Uncheck Enable IPv6 Support
Check Enable IPv4 Support
Select Manual Configuration
IP Address = 192.168.1.1
Prefix (Netmask) = 255.255.255.0
Click OK
Step 12: Click Next and Change the region to Asia/Dubai

Step 13: Specify root password and Click Next
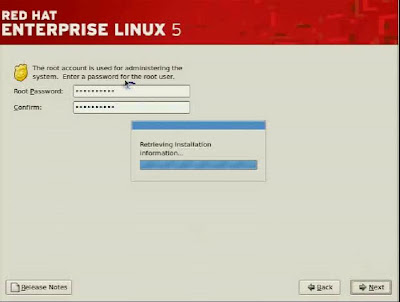
Step 14: Select Customize later and Click Next

Step 15: Click Next to start the Installation

Formatting the File System

Transferring the Image to Hard Drive
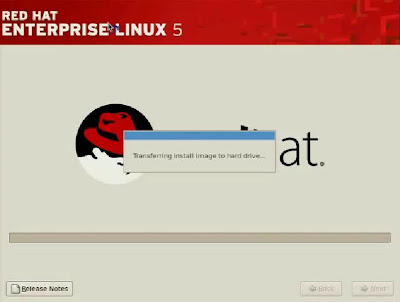
Step 16: Server Reboots and then Click Forward

Step 17: Agree the License Server and then Click Forward

Step 18: Click Forward with the default options on Firewall
Step 19: Click Forward by changing SELinux=disabled

Step 20: Click Forward by checking Enable kdump

Step 21: Click Yes and then forward

Step 22: Set the date and time and click forward
Step 23: Select No,I prefer to register at a later time
Step 24: Click Forward


Step 25: Create user and Click Forward

Step 26: Click Forward with default options for Sound Card
Step 27: Click Forward with default options for Additional CDs
Step 28 : Click Finish to finish the Installation.
Step 29 : Login Screen

........
Linux Installation: (RHEL 5.4)
Ram:2gb
Hard Disk:140gb
Intel X86 platform
Step 1: Mount the Red Hat Enterprise Linux X86_64 image and boot the server and at the splash screen press Enter key to begin install.

Step 2: Select OK to run a media test (optional) or skip

Step 3: Select Next

Step 4: Select English and press Next

Step 5: Select the Key board type as US English and press Next

Step 6: Select skip entering the installation number and Click OK.

Step 7: Click SKIP

Step 8: Select Create Custom Layout and Click Next


Step 9: Creating Partitions

Step 9.1: Click – New –Add Partition Window Opens

Mount Point = /boot
File System Type=ext3
Size(MB) = 2000
Check force to be primary partition and Click OK
Step 9.2: Click – New –Add Partition Window Opens

File System Type=physical volume (LVM)
Size(MB) = 137978
Check force to be primary partition
Click OK
Step 9.3: Click LVM – Make LVM Volume Group Window opens

Specify Volume Group Name =vgroot
Click on Add – Make Logical Volume Window Opens
Mount Point = /
File System Type=ext3
Logical Volume Name=lvroot
Size (MB) =10000
Click OK
Step 9.4: Click on Add – Make Logical Volume Window Opens
Mount Point = /usr
File System Type=ext3
Logical Volume Name=lvusr
Size (MB) =12000
Click OK
Step 9.5: Click on Add – Make Logical Volume Window Opens
Mount Point = /var
File System Type=ext3
Logical Volume Name=lvvar
Size (MB) =15000
Click OK
Step 9.6: Click on Add – Make Logical Volume Window Opens
Mount Point = /tmp
File System Type=ext3
Logical Volume Name=lvtmp
Size (MB) =10000
Click OK
Step 9.7: Click on Add – Make Logical Volume Window Opens
Mount Point = /home
File System Type=ext3
Logical Volume Name=lvhome
Size (MB) =5000
Click OK
Step 9.8: Click on Add – Make Logical Volume Window Opens
Mount Point = /opt
File System Type=ext3
Logical Volume Name=lvopt
Size (MB) =8000
Click OK
Step 9.9: Click on Add – Make Logical Volume Window Opens
File System Type=lvswap
Logical Volume Name=lvswap
Size (MB) =32000
Click OK
Step 10: Click Next

Step 11: Here we can specify Network Settings


Set the hostname manually = ecs01.ecsme.com
Specify Gateway = 192.168.1.0
Click on Edit
Uncheck Enable IPv6 Support
Check Enable IPv4 Support
Select Manual Configuration
IP Address = 192.168.1.1
Prefix (Netmask) = 255.255.255.0
Click OK
Step 12: Click Next and Change the region to Asia/Dubai

Step 13: Specify root password and Click Next

Step 14: Select Customize later and Click Next

Step 15: Click Next to start the Installation

Formatting the File System

Transferring the Image to Hard Drive

Step 16: Server Reboots and then Click Forward

Step 17: Agree the License Server and then Click Forward

Step 18: Click Forward with the default options on Firewall
Step 19: Click Forward by changing SELinux=disabled

Step 20: Click Forward by checking Enable kdump

Step 21: Click Yes and then forward

Step 22: Set the date and time and click forward
Step 23: Select No,I prefer to register at a later time
Step 24: Click Forward


Step 25: Create user and Click Forward

Step 26: Click Forward with default options for Sound Card
Step 27: Click Forward with default options for Additional CDs
Step 28 : Click Finish to finish the Installation.
Step 29 : Login Screen

........
Subscribe to:
Posts (Atom)